Danish æblekage

Æblekage means apple cake in Danish. But this isn’t actually a cake at all. It is more like a kind of apple trifle made out of homemade applesauce, whipped cream and buttery sweet roasted breadcrumbs. It is a very traditional Danish dessert and I love it so much. I hadn’t had it for a long time, so when I saw some very sad looking apples in my dad’s windowsill this weekend, I knew I had to turn them into old-fashioned æblekage.

This weekend has been beautiful. There is a nice layer of snow and today the sun was out, so I have taken most of the pictures for this recipe in my Dad’s garden, in the snow. It was freezing cold taking the pictures, but I just couldn’t resist having the beautiful white snow in the photos.
What you need to make this as a dessert for 4 people:
Applesauce
425 g. apples, cored and peeled and cut into chunks
Juice of half a lemon
2 tablespoons sugar
One empty vanilla bean
Breadcrumbs
130 g./4,6 oz. very dry, white bread (if you don’t have bread quite that stale, dry it in the oven, sliced, at 100C/210F until it is completely dry)
80 grams/2,8 oz. butter
1,4 dl./0,6 cups sugar
Cream
2,5 dl./1 cup organic whole cream

Add the apples to a pot along with the vanilla bean and add a splash of the water. Bring to a low simmer and see how the apples react. My apples were old and dry and needed the whole deciliter of water to not dry out. If your apples are fresh and juicy, you will probably need just the splash in the beginning to keep them from burning. Let it simmer until the apples have turned to mush, about 15 minutes, while keeping an eye on it, adding water as necessary. The applesauce should not be too liquid, but still smooth. When the apples have dissolved, you can add the lemon and the sugar. Add a little at a time as it really depends on your apples how much you’ll need. Taste it. It should not be overly sweet or sour. The sugar is only there to enhance the apple flavor and the same goes for the lemon juice. When you are satisfied with your apple sauce, put it to the side, and let it cool down completely. When cool, remove the vanilla bean.

Now we are making breadcrumbs. Take your very dry bread and turn it into crumbs. I did it by beating it with the bottom of a pot, while it was in a plastic bag. It might be easier to use a blender or food processor. I like there to be some chunks left for texture. Melt the butter in a pan. When it has melted, but not browned, add the crumbs and the sugar. Over medium heat, keep stirring until it all has turned golden. It is slow at first, but all of a sudden it is very quick, so don’t leave it out of your sight. Transfer to a baking sheet and spread it out. Leave it to cool. You will probably end up with too big a portion of breadcrumbs, but use the leftovers on your yoghurt in the morning along with some fruit.
Now, all there is left to do is whip the cream, and put the dessert together. Traditionally you would put it in a big crystal bowl, and serve people from there. I like to make individual servings, but either way, you just layer the ingredients. I start with applesauce, then breadcrumbs and a good dollop of whipped cream. Then another layer of applesauce, finishing with more breadcrumbs.
And there you have it. It is so simple, but so good!

Seedy crackers and herby cheese
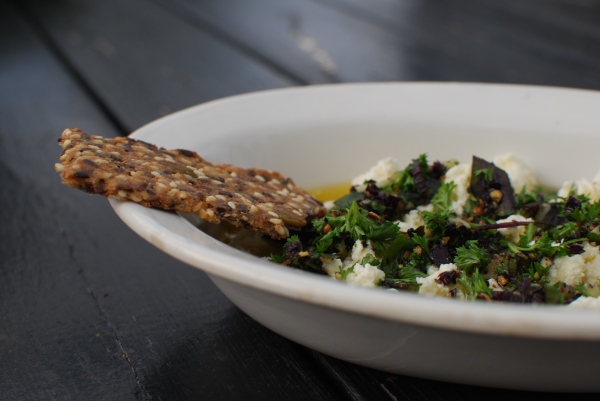
 This post has been on its way for a long time. This fall has been crazy, but with this new year, things are finally changing. In the fall I was on a cheese craze. I got this idea in my head that I should be making my own cheese. And so I did. A fresh goats cheese. And with this kind of fresh cheese, I needed crackers. And these crackers are amazing. And easy! They taste like toasted seeds and go so, so well with the tangy cheese. Ohh, and the cheese. Marnie, my mother-in-law, gave me a cheese trick this summer. You take a fresh goats cheese and put it in a shallow bowl. You crush up some salt, black pepper, garlic and fresh herbs and spread it over the top. And then you drizzle olive oil over it. It is so simple and so good. Especially on a hot summers night with a glass of wine on the side.
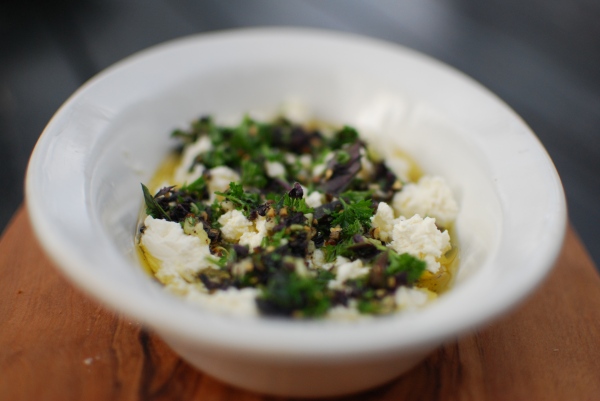 And it looks pretty, too. If you are interested in making your own chèvre, I used this recipe and it really came out very nicely. And for the crackers. This is a very widely used and well-known recipe in the Danish blog world. I used this for inspiration.
Here’s what you need:
4 dl./1,7 cups seeds (I used sesame, pumpkin and linseed, but you can use the seeds you like best)
1 dl./0,4 cups oats
3,5 dl./1,5 cups flour
1 teaspoon baking powder
2,5 teaspoons sea salt
2 dl./0,85 cups water
1,3 dl./0,55 cups neutral oil

Turn the oven to 200C/390F. Mix all the ingredients in a bowl until they are thoroughly combined. Divide the portion in half. On a piece of parchment paper, lay out the first portion of dough. Place another piece of parchment paper on top of the dough. Massage and press it until it is uniformly about 1/4 centimeter thick. Remove the top layer of parchment and transfer the dough (still on the bottom piece of parchment) to a baking tray.
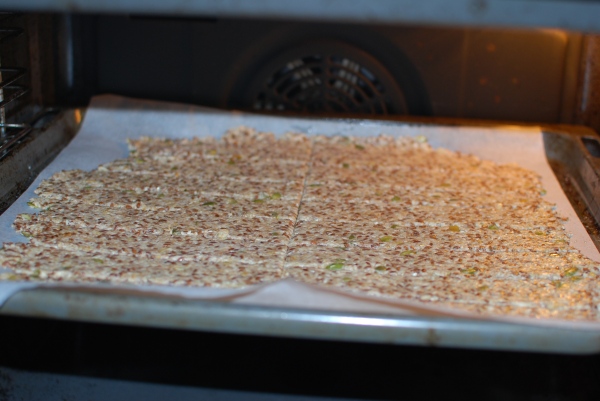
Using a knife, cut the dough in the shapes you would like. You don’t have to cut all the way through, just making the lines in the dough, makes it easier to break it apart nicely when it’s done. Bake the crackers for about 15 minutes. Make sure they are done, though. The smell should be like toasted seeds and nuts and it should be golden all over. I think it is better to overcook these crackers than to take them out before they are completely done. So the baking time is a pointer only. Keep an eye on the oven. Repeat with the second portion of dough and keep the crackers in an airtight container and enjoy.
Raspberry filled doughnuts on a rainy summer’s day

Imagine this. You are on vacation and the weather is shitty. Rainy and foggy and cold. What do you do? What I chose to do when I woke up on this rainy day in Maine, was to embark on a baking journey, more precisely on a doughnut journey. I have made doughnuts before, just plain glazed ones. They were absolutely delicious, but my favorite kind of deep fried sweet treat will always be the raspberry filled variety coated with sugar, also known as the Berliner pfannkuchen. I grew up eating this kind of doughnut whenever I got a chance, always with the goal of eating it without licking my mouth (which is very difficult!). They have the taste of childhood to me, and the tartness of the raspberry jam filling goes amazingly well with the fried sweetness of the doughnut and the crunchy sugar. The recipe I used was an adapted mix of Joy the Baker’s recipe and the one from the Joy of Cooking.

What you need to make 13 doughnuts
For the batter
1 package of dry active yeast (2 1/2 teaspoons)
2 tablespoons warm water
1/2 stick / 60 g. soft salted butter
3 egg yolks
3 1/2 cups / 8,3 dl. flour
2 tablespoons sugar
1 teaspoon salt
1/2 teaspoon vanilla
1 cup / 2,4 dl. whole milk (at room temperature)
And
Raspberry jam for the filling
An egg white for brushing
1,5 l. / 48 oz. vegetable oil for frying
A cup of sugar for coating
How to
Mix the yeast with the warm water. Stir it and let it sit for five minutes, until it gets foamy. Once the yeast is foamy mix it with the egg yolks, butter, milk, flour, sugar, salt and vanilla. If you have a stand mixer, use it, and beat the dough on low until combined, then on medium for 3-4 minutes. I used a fork to mix the ingredients, and then used my hands to knead the dough on the counter top for about 5 minutes, until it was smooth and didn’t stick to the counter. You can adjust the amount of flour if the dough is still too sticky with the 3 1/2 cups, but don’t add too much. It isn’t supposed to be a dry dough. When the dough is kneaded, place it in a bowl, sprinkle it lightly with flour, and cover the bowl with a dish towel. Leave it to rise until it doubles in size; it took me 1 1/2 hours.
Roll out the dough to a thickness of about 0,2 inches / 1/2 centimeter and cut out 2 inch / 5 cm. rounds of dough. Cut as many as you can without creating too many scraps, preferably an even number. I got 14 nice looking ones, and created some messy looking ones out of the scraps.

On half of the rounds, place about 1/2 teaspoon of good raspberry jam. Then brush the edge with the beaten egg white and place another round on top, gently pressing down on the edges to seal in the raspberry filling. Let the doughnuts rest for about half an hour.

Fry in plenty of 350F / 175C hot oil, two at a time, until golden brown turning over once. Meanwhile fill a plate with a cup of sugar. Drain the doughnuts on paper towels and immediately after roll the doughnuts in the sugar.

Serve warm, or within a couple of hours. They are so, SO good fresh! Enjoy your doughnuts and just you try to eat one without licking your mouth.

Grilled mackerel with garlic and parsley butter

I had the best fishing experience this morning. Andy and I are in Maine (in the US) and early this morning we went out with his parents on the Belfast harbor for muffins and coffee, bringing along two fishing poles. We never really expected to catch anything, but it was a true success and we ended up with six beautiful mackerels to have for lunch. We gutted the fish and cut the bones out so we had two nice fillets per fish.

Marnie, my mother-in-law, made a small fire, and over it we grilled the fillets on both sides for a couple of minutes. We melted some leftover garlic/parsley butter (just made of butter, garlic and chopped parsley all mashed together) and poured it over the mackerel fillets along with a sprinkling of sea salt.

It was just the perfect lunch, served with some steamed green beans from the garden!
Avocado cake with Lifou vanilla and lemon zest

I have to start by saying that even though this cake sounds weird, it is truly delicious. Just ask Andy, Lærke and my mom who helped me eat (all of) this cake on one sunny afternoon in Bornholm. It is sort of like banana bread, but with avocado instead of banana and with a beautiful, pale green color and subtle taste of avocado.
The idea for this cake was literally brought to me one morning in Lifou, when my sweet neighbor Odile left a plate for me on the kitchen table while I was showering.

It was avocado cake, beautifully green, very spongy and not sweet at all. While it was very delicious as it was, I was excited to develop the cake further by adding lots of vanilla and lemon zest. Also I wanted to make it a bit sweeter and less dense. So a few days ago when I found some ripe avocados, I decided to go for it, and I am so happy I did. It came out just like I had imagined, and Andy is already asking me to make it again. Success!
Before I give you the recipe, I want to tell you why I was so keen on adding lots of vanilla to this cake. My other neighbor in Lifou, Vaie grows her own vanilla. Most people do in Lifou, and it gave me a much more intimate relationship with the vanilla bean, seeing how it grows and what care is put into each bean. I brought home lots of vanilla, for myself and for my friends and family, and I used a beautiful one for this recipe. So this cake really became the taste of Lifou for me. The mix of avocados (which I ate from the garden almost every day) and vanilla, is like a picture of the produce that grew right around me, and I was very happy to put them together in this cake.

What you need
150 g./5,5 oz. soft butter
190 g./6,5 oz. sugar
1 vanilla bean
3 eggs
The zest of one lemon
A pinch of salt
150 g./5,5 oz. flour
1 teaspoon baking soda (natron)
1 teaspoon baking powder
3 ripe avocados (I used hass)


How to
Turn the oven to 180C/350F. Beat the soft butter with the sugar, the seeds from the vanilla pod and finely grated lemon zest until white. Add one egg at a time while beating. Add the flour, salt, baking powder and soda and mix until combined. Open up the avocados and mash them up in a bowl until pretty smooth. Add them to the batter and make sure it is thoroughly mixed. Grease a loaf tin and dump the batter in it. Bake it in the middle of the oven for 30 minutes, or until a knife comes out clean. If it takes color too quickly, cover it with some silver foil until it is done. Let it cool before eating, and have it with your afternoon coffee, preferably in the sun.

Wonderful rhubarb meringue cake
 After coming back to Denmark I have been going completely overboard, cooking and baking all the time. I have especially been excited to cook with all the amazing seasonal foods that are out right now, like new potatoes, strawberries, and last but not least, rhubarb.

The recipe for this rhubarb cake is on a magazine page that looks to be from the seventies, but it doesn’t have either the name of the magazine nor the author of the recipe. My Dad has kept it in his little green recipe box for ages, it being his favorite rhubarb cake, and I completely understand why. It is absolutely delicious, simple to make and keeps really well, at least for the three days it lasted in this household.
And here is what you need to make it
For the batter
175 g./6,5 oz. soft butter
150 g./5,5 oz. sugar
2 tablespoons of good vanilla sugar
A pinch of salt
3 egg yolks
200 g./7 oz. flour
2 teaspoons baking powder
5 tablespoons whole milk
For the rhubarb meringue
3 egg whites
200 g./7 oz. sugar
100 g./3,5 oz. roughly chopped walnuts
500 g./1 lb. rhubarb

And here is how
The first thing I did was to go to my dad’s garden to find the rhubarb. If you’re not lucky enough to know someone with this bounty in their garden, you can of course buy them, too. I prefer the skinny, deep red rhubarb in the picture, but you can use the fatter, greener kind as well, I am sure. Take off the tops and bottoms and wash them well. Cut into inch-long bits and set aside. Turn the oven to 180C/350F.
With a mixer of some sort, beat the butter, sugar, vanilla sugar, salt and egg yolks until creamy. Mix the flour and baking powder and add to the buttery mix little by little while beating. Add the milk. Butter a cake pan (I used 24×30 cm.) and add the batter. Even it out.
 In a clean bowl, beat the egg whites until almost stiff, then add the sugar little by little, and keep beating until it forms soft but steady peaks. Mix the rhubarb and walnuts in with the meringue, and spread the mixture over the batter. Throw the sucker in the oven and bake it for about 30 minutes. Keep an eye on it, though, as you don’t want the meringue to burn. If the meringue is done (golden brown) before the rest of the cake, just cover with some silver foil so it won’t burn. Test it with a knife, to see if it comes out clean. When it does, the cake is done.
 Serve it warm with whipped cream and a good cup of coffee and you will definitely be in early summer heaven. ENJOY!
The recipe tells you NEVER to cover the cake to keep the meringue crispy, but I covered it and even without crispy meringue, it was awesome and kept moist and delicious for three days.
Four months of food in New Caledonia

A week ago today I found myself back in Denmark after spending four months in New Caledonia. Before leaving for my trip I had great plans for all the blogging I would do out there, especially because my ethnographic focus was on food most of the time. But no. Circumstances, like a dead computer and insanely expensive internet access 40 minutes from where I stayed, made me live more simply, sans blogging and internet fun. But what and where is this New Caledonia anyway and what are the brown things in the picture? you ask. Well, New Caledonia is a French colony in the Pacific, sort of on the Australian side. It consists of a big island and six small, inhabited ones (and countless uninhabited ones as well). I stayed in Lifou, a gorgeous island paradise with the nicest people I have ever met and the most fabulous beaches. Also it has lots of yams, which is the root in the picture above. And no, they are not like sweet potatoes. They are more like regular potatoes, just more stringy and starchy. I was out in New Caledonia to do anthropological fieldwork for my master’s thesis, and it all ended up being about the yams. Yams are SO important to the Kanaks (the Melanesian population)! They are sacred and pretty much the materialization of Kanak identity, hope for the future and a huge part of their daily lives. When you serve yams to someone, it is like giving a part of yourself away, like sharing yourself with the guest. Alright, I could go on and on, but I will leave it at that for now, and you can read my thesis when it is written. It will have much, much more on the yams!
I do want to show you one amazing dish that is made with yams, the bougna.
 The bougna is a festive way of making yams. It has yams, coconut milk, chicken and bananas which are all wrapped up in banana leaves tied with vines, making a tight package that is cooked in an underground rock oven. The bougnas in the picture are made for a wedding, from the bride’s family to the groom’s, as a way of showing the new connection between the families. I got to join the groom’s family in eating this very symbolic feast.

The wedding lasted more than a full week and every day the village of the groom (which was where I lived) cooked up a storm.

We women sat around, cutting up vegetables and meat. The young men cooked the food in huge pots over open fires, and huge batches of rice salads with beets and egg were mixed and seasoned.


But I ate lots of stuff other than just yams and wedding food. As New Caledonia is a part of France, Andy and I stuffed ourselves with foie gras and cheeses every time we got the chance. Beautiful fresh tuna was cheap as dirt at the market, and I ate so much sliced, raw tuna with just a drizzle of olive oil and salt and pepper. I wish it was affordable to do that here in Denmark!
 Aside from all these wonderful foods, the garden of Lizie, the old lady I lived with, was teeming with beautiful stuff. I was there for avocado season, and every day we ate avocado and grapefruit salad. It was wonderful, but I was so sick of avocado by the end!
 The last thing I want to show you is one of my favorite fruits, pomme cannelle. It is so weird looking, but when ripe it is one of the most aromatic and sweet fruits I have tasted. If you ever find one in a market somewhere you must buy it! It is ripe when it feels like a perfectly ripe avocado. You just break it open and eat the soft, white flesh, leaving behind the black seeds.
 All in all, New Caledonia was incredible. I don’t know if I loved it more for its people or for its beauty, but if you ever get a chance to go, do it! It has certainly enriched my life.
My favorite carrot cake
 Long time no see! I am very sorry it has been so long since my last post, but somehow November, December and now January just slipped away before my eyes. I have been very busy, and somewhat stressed over my upcoming four-month ethnographic fieldwork that I am doing all by my lonesome in New Caledonia. I am leaving in a little over a week now, and am starting to look forward. Maybe you will hear more about my (food) adventures while I’m away.
But first I want to introduce you to my favorite carrot cake recipe. I have been making it for the last five years, and every time I feel convinced that I will never find a carrot cake that I like better. I found the recipe some years ago on DR’s website, created by the Swedish chef Tina Nordström. It is not really showing up online anymore, though, and I also made several adjustments, so here is my version of Tinas carrot cake.
To make a pretty big batch (about 2 springforms) you need:
For the cake
3 eggs
3½ dl. /1.1 cup sugar
3 dl./1 cup coarsely chopped walnuts
1½ tablespoon ground cardemom
1 tablespoon ground cinnamon
2½ teaspoons bakingpowder
½ teaspoon salt
4 dl./1.7 cups flour
4 dl./1.7 cups finely grated carrots
2½ dl./1.1 cups neutral oil
For the frosting
2 dl./0.9 cups powdered sugar
200 grams/7 oz. butter, melted and cooled
200 grams/7 oz. cream cheese
Finely grated peel and juice of one lemon or two limes
2 tablespoons vanilla sugar

How to:
Heat your oven to 200c/390F. Beat the eggs with the sugar until white and foamy. Add the walnuts, cardemom, cinnamon, bakingpowder, salt and flour to the sugar/egg mixture and combine. Add the carrots and oil to the mix and combine until smooth. Grease two springforms (or one big ovenproof dish) and pour in the batter. Bake in the middle of the oven for 30 minutes (40 if you are making one big cake), or until a knife or pin comes out clean. Let the cake cool completely. Now you are ready to make the frosting. In a bowl, beat the powdered sugar with the cream cheese and butter until smooth. Add the vanilla and the lemon/lime peel, and juice and beat until it is all combined. Now you can decorate the cake as you wish. To make a high cake, first frost the top of one cake. Then place the other one on top of it and frost the top and sides. Decorate with walnuts. And remember to have it with a glass of cold milk!
Lavender and lemon pound cake

I am having a bit of a weird obsession these days. I have this compulsion to cook with (and eat) everything lavender. I made a honey/lavender ice cream a while back which came out great and I brought home an amazing lavender salami from a recent visit to Amsterdam which was also so, so delicious. Well, today is an extremely grey day here in Copenhagen, and I felt the need to spice it up with some cake baking, and eating. I settled on this lemon/lavender pound cake, and it came out perfect! It is moist, perfumy from the lavender and deliciously lemony. I found the recipe here, and adapted it to fit my temper.
For one beautiful cake you need
For the batter
190 grams soft butter
3/4 cups sugar
1/6 cup milk
3 eggs
2 tablespoons lemon juice
2 tablespoons lemon zest
1 teaspoon vanilla (essence, vanilla sugar or the seeds of a pod)
1,5 cups flour
3/4 teaspoon baking powder
1/4 teaspoon salt
1/6 cup dried lavender flowers
For the frosting
Juice and zest of half a lemon
70 grams powdered sugar


Start by turning the oven to 175C/350F. Beat the soft butter with the sugar until creamy. Add all the dry ingredients except the lavender and mix until combined. In another bowl mix the wet ingredients. With an electric mixer (or in a stand mixer) mix in 1/3 of the milk/egg mixture to the butter/sugar/flour mix. Mix for 1 minute, then add another third of the liquid to the mix. Again beat for a minute until adding the rest of the wet ingredients to the mixing bowl. Beat it all for another minute until it is a beautiful batter. Mix in the lavender. Butter a round cake pan (or loaf pan if you like) and add the batter to it.
Bake it for about 35 minutes, or until a pin comes out clean. Let it cool completely. Then mix the lemon juice, zest and powdered sugar to make the glaze. Dress the cake with the lemony frosting and sprinkle some lavender flowers over the cake to make it pretty. Let the frosting dry, and enjoy!
Great places to eat in Singapore
 Before I got back to Denmark, Andy and I spent 4 days in Singapore, dealing with the Indonesian embassy, getting Andy’s research permit ready to go. Maybe I haven’t said before, but Andy is still in Indonesia now, doing ornithological fieldwork in the jungles of Flores for the next two months. So before we parted, we enjoyed ourselves with lots of good food in Singapore. I had done quite a bit of research on restaurants beforehand, because of some major food cravings while in Indonesia, after eating rice every day for over a month. I am sorry for the lack of pictures, but I decided to dress up for most of the meals bringing only a small purse with me which wouldn’t fit my camera.
Au Petit Salut
We went to Au Petit Salut for lunch because it was supposed to have a very good, and relatively cheap lunch menu priced at 32 S$. Andy and I ordered different things, and I was definitely the one who lucked out. Andy’s niçoise salad and braised beef cheeks were good, but not great, whereas my snails were the best I ever had, and my pork in mustard on polenta equally amazing. Both the strawberry shortcake and the choux buns were delicious desserts. I would definitely go back! It is a popular spot so call ahead.
40C Harding Road
Tel: 6475 1976
Pizzeria Mozza
Pizzeria Mozza is owned by the pretty famous Mario Batali (in the US anyway) and is attached to the fancier Osteria Mozza right next door. I went to Pizzeria Mozza alone before my flight out of Singapore for a quick dinner. I had a nice glass of Valpolicella and the pizza with burrata (a home made cheese, sort of like mozzarella but with double the fat), slow roasted tomato and oregano. It was absolutely divine! It was one of the best pizzas I have ever had, and I will go to great lengths to try to replicate it. There is a picture of it above, and here is a picture of the restaurant:

I went to Mozza on a random Sunday evening at 6pm and they were fully booked, so it is a good idea to call ahead if you don’t want to dine at the bar (as I did, and it was fine).
2 Bayfront Avenue (inside the Marina Bay Sands shopping centre)
6688 8522
Iggy’s
I went to Iggy’s all by my lonesome and pretty impulsively right after Andy had left for Jakarta. Iggy’s is currently 27th on the S. Pellegrino 50 Best Restaurants list. I was amazed that they had a table available on very short notice, and I went power shopping for something decent to wear half an hour before my reservation.

I got the set 4 course lunch menu for 85S$. First I got an amuse bouche of smoked eel parfait with caviar and a citrus gel. It was amazing, and definitely the best dish I had at Iggy’s. As my first real course I had their version of the classic niçoise salad. It was very good, and especially the truffle mayo and olive sphere made it amazing. Second dish was spaghettini with smoked mullet roe and zucchini. This dish I actualy disliked. I had four bites, trying all I could to see the genius in the dish, but I did not succeed. I left the rest, and considered it as a blessing in disguise because it meant that I could eat more of the delicious bread and smoked butter with parmesan. Third dish was confit of duck with mashed potatoes. It was good, but I could have made it just as delicious in my own kitchen. I expected more of one of the best restaurants in the world! For dessert I had caramel, brown butter ice cream, grapefruit, miso and pecan. It was very delicious!
So all in all I was pretty disappointed by Iggy’s. Two of the four dishes were nothing special and one of them I actually disliked. I had a glass of 2006 Meursault Les Meix Chavaux Blanc to drink though, and it was probably the best wine I ever had! If anyone knows where to find this wine, please give me a hint as I haven’t been able to find it on the internet. Service was good at Iggy’s, but the staff seemed to find it weird that I was there all by myself. I guess my conclusion is that I would not go back to Iggy’s for lunch. I am not sorry I went, but I would not do it again. Maybe dinner is better though.
581 Orchard Road, 3rd floor @ The Hilton
6732 2234
Royal China
Andy and I had our sunday lunch at Royal China. I had done some research and it sounded like Royal China was the best bet for stand out dim sum in Singapore. We had some excellent dim sum when we traveled around Hong Kong and China some years ago, and I was eager to have some again. Royal China is located at the Raffles hotel, and looks pretty fancy, but we had (lots of) dim sum, and I thought it was a very good deal as the were about 3S$ each. We had a pot of jasmine tea and 7 different dim sum and got very full. The best were the scallop dumplings and the crispy shrimp rolls. The other dishes were great as well though. I love dim sum and Royal China did not disappoint! Again, call ahead for reservations.
1 Beach Road @ The Raffles hotel arcade
6338 3363
Maxwell Road Food Centre
Singapore has tons of wonderful food courts, and Maxwell road food centre was my favorite one. It is famous for the stall called Tian Tian which connoisseurs say makes the best Hainan chicken rice in all of Singapore. Just look for the long line, and you will find Tian Tian. The chicken rice was wonderful, but I think the real gem is this one:
 It is the stall with the writing fried sweet potato dumpling on the bright yellow sign. I still dream of the coconut dumpling, which had the most amazing texture and sweetness. So good!
 Well, the centre is packed full of cheap and interesting food, and it is pretty much a paradise for a food lover like myself.

Where Maxwell Road meets South Bridge Road
New Asia Bar
The New Asia Bar is located on the 71st floor, high above Singapore with an amazing view of the city. Andy and I had cocktails there, and despite the expensive drinks, it was worth it for the view. We just sat there for hours with our cocktails, holding hands, and had a great time. The food looked pretty bad though (from what other people were having).
2 Stamford Road
71st floor of the Swissôtel The Stamford
Cocotte
After drinks at the New Asia Bar we went to a late dinner at Cocotte in the middle of Little India. I had read that their whole roast chicken which was supposed to be out of this world tender and delicious. And it really was! I think Andy said it best: It’s like it is not even chicken. It is like if a chicken and a pack of butter had a baby. It really was like no chicken I ever tasted before, and I would go back in a heartbeat for it. We also shared a crème brûlée for dessert, which was also perfect.
2 Dickson Road
6298 1188


